


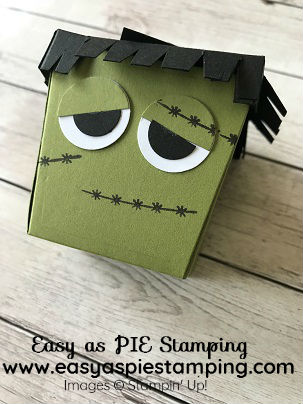
A Monster Takeout Treat Box
Hello Paper Crafters!! This is the second project I made at Stamp Club this month. How cute is this Monster Takeout Treat Box? I think this is a very clever idea; to make a Frankenstein’s Monster out of the Takeout Box. These would be perfect for a classroom exchange. Just fill each one with some Halloween candy or small toys. If you are ambitious you could give these away to Trick or Treaters.
Monster Takeout Treat Box

Monster Takeout Treat Box
The Takeout Treats Bundle
This bundle has a wide variety of sentiments to be used with the Takeout Box. The Takeout Treats stamp set includes sentiments for Halloween, Christmas, Valentine’s Day, Thank yous, and more general sentiments like Yum!, Enjoy or This is for You! These boxes go together so quickly that you will have no problems making enough.

Monster Takeout Treat Box
To see another fun Halloween Project click here.
The Color Palette
Recipe: Paper. Images. Embellishments.
Paper: Old Olive, Basic Black and Whisper White card stock
Images: Takeout Treats Bundle & Tuxedo Black Memento Pad
Embellishments: 1/8” Old Olive Sheer Ribbon
Extras: Stitched Shapes Framelits, Everyday Label punch, ¾” circle punch, ½” circle punch, 1/8” handheld punch, Paper Snips, Stampin’ Trimmer, Big Shot, Tear & Tape, Dimensionals and SNAIL
The Project:
Step 1:
Cut your pieces.
- Old Olive card stock: Cut in half horizontally (5 ½” x 8 ½”) and use box die from Takeout Thinlits dies and cut 2 pieces out of Old Olive card stock.
- Pieces for the Eyes: Punch 2 Whisper White & 1 Old Olive circle with ¾” Punch. Cut in the Old Olive circle in half.
- With the ½” Punch: 1 Basic Black circle and cut in half.
- Everyday Label Punch: Punch one from Basic Black CS.
- Monster’s hair: Cut Basic Black CS to 3 1/8” x 2 ¾” and scored at little less than ½” on all sides. Fold along score lines. Create side flaps for lid by cutting along the thick black lines in the photo below. Then “snip” all 4 sides to create “hair”. Tape corners together to create a lid. Use one Dimensional to adhere lid to one box flap (so you can open the box without tearing it).
- Cut 4” of 1/8” Old Olive Sheer Ribbon.
Step 2:
Stamp your images.
- Stamp sentiment on Whisper White CS with Old Olive ink and cut out using smallest square from Stitched Shapes Framelits and adhere to Everyday label, trim off one end and punch 1/8” hole for the ribbon. Thread ribbon through hole and tie in a knot.
- Use image from Takeout Treats stamp set to create the mouth and a few scar lines on the face of your monster. Tip: Do this before you put the box together.
Step 3:
Putting it all together.
- Layer circles to make eyes and glue on widest side of box.
- Place tear & tape on bottom and side flaps.
- Use a Dimensional to attach to the top of the monster’s head.
Free Monster Takeout Treat Box PDF Download
I hope you enjoyed this project tutorial.
Sign up for my weekly newsletter in the sign up box – top right (or at the bottom on mobile).
My project supply list. Click products to shop online!
 |  | |
 | ||
 |  | |
 |  |


Visit My SHOP!!
When placing an order in October use host code:
QUGQMWTM
Please join me every week as I share projects using Stampin’ UP! products.
We will have so much fun!
I would be honored to be your personal Stampin’ Up! Demonstrator!!
Happy Stamping,
Lois Avellanet
Creativity Coach
My mission is to teach you how to find your inner artist so you can create beautiful works of art to give to family and friends. I have a simple “recipe” that will make creating cards Easy As PIE. This is all you need to do: |


