


A Spooky Sweets Halloween Card
Hello Paper Crafters!! I created this cute Spooky Sweets Halloween card at my Stamp Club this month. I just love this color combination: Bermuda Bay, Pumpkin Pie & Rich Razzleberry. There are lots of nice images in the Spooky Sweets stamp set. The texture stamp can be used to create spooky clouds in the night sky. I have also seen it used to create a texture on tombstones.
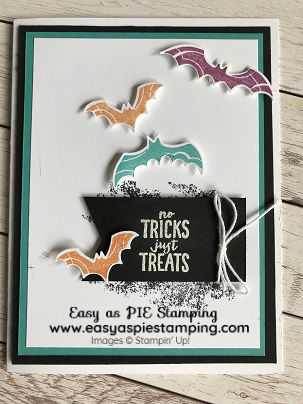
Spooky Sweets Halloween Card

Spooky Sweets Bundle
The Spooky Sweets Bundle
I think the Spooky Bats punch is my favorite part of this bundle. You can punch 3 bats at once. In no time at all you can punch a whole lot of bats from Basic Black card stock. The technique I used, by coloring the individual bats on the rubber stamp with the Stampin’ Write Markers, is an easy way to add a lot of color to a project.
To see another fun Halloween Project Click Here
The Color Palette
Recipe: Paper. Images. Embellishments.
Paper: Thick Whisper White, Basic Black, Whisper White and Bermuda Bay card stock
Images: Spooky Sweets Bundle, Tuxedo Black Memento Pad, Rich Razzleberry, Bermuda Bay and Pumpkin Pie Stampin’ Write Markers
Embellishments: Whisper White Solid Baker’s Twine
Extras: Tailored Tag punch, White Stampin’ Emboss Powder, Versamark Pad, Heat Tool, Mini Dimensionals, Stampin’ Trimmer, and SNAIL
The Project:
Step 1:
Cut your pieces.
- Thick Whisper White card stock: Cut 8 ½” x 5 ½” & scored at 4 ¼”.
- Basic Black card stock: Cut 5 ¼” x 4” plus 2 ½” x 1 1/8” for banner.
- Bermuda Bay card stock: Cut 5” x 3 ¾”.
- Whisper White card stock: Cut 4 ¾” x 3 ½” plus scraps for bats.
- Use the Tailored Tag Punch to flag one end of the Basic Black banner piece.
Step 2:
Stamp your images.
- Stamp your sentiment in Versamark onto the Basic Black banner. Sprinkle with white embossing powder and heat with a heat tool until raised and shiny.
- Ink texture stamp from “Spooky Sweets” with Tuxedo Black Memento ink and stamp twice, near the middle right, on white 3 ½ x 4 ¾” card stock.
- Use Rich Razzleberry, Bermuda Bay and Pumpkin Pie Stampin’ Write Markers to color on each bat and then stamp on scrap of Whisper White card stock. Punch the bats out with the Spooky Bats punch.
Step 3:
Putting it all together.
- Adhere the stamped Whisper White CS to Bermuda Bay CS and layer onto Basic Black CS and then onto the Whisper White card base.
- Wrap White Baker’s Twine around right side of banner and tie in a bow. Then adhere banner to card with dimensionals.
- Adhere bats to the card using Mini Dimensionals.
Free Spooky Sweets Halloween Card PDF Download
I hope you enjoyed this project tutorial.
Sign up for my weekly newsletter in the sign up box – top right (or at the bottom on mobile).
My project supply list. Click products to shop online!
 | ||
 |  | |


Visit My SHOP!!
When placing an order in October use host code:
QUGQMWTM
Please join me every week as I share projects using Stampin’ Up! products.
We will have so much fun!
I would be honored to be your personal Stampin’ Up! Demonstrator!!
Happy Stamping,
Lois Avellanet
Creativity Coach
My mission is to teach you how to find your inner artist so you can create beautiful works of art to give to family and friends. I have a simple “recipe” that will make creating cards Easy As PIE. This is all you need to do: |


